|
||||||||
|
|
||||||||
|
Planning a Home Theater |
||||||||
| Rear Projection vs. Front Projection | ||||||||
|
If you have decided on projection, choosing front or rear projection will determine the course for the rest of your theater design. Front projection is by far the most popular projection arrangement since it is easy to install and space efficient. And perhaps home entertainment design has become over-focused on the concept of a dedicated home theater room that is replicated on movie-theater style front projection. But the advantages stop there as it has inherent operational and performance deficiencies: |
|
|||||||
| - Front projection is very sensitive to ambient light so it needs to be used in a dedicated theater room with little or no lights including windows or natural light. This only limits the ways the room can be utilized, therefore lowering its efficiency. | ||||||||
| - It produces a narrow viewing cone; creating only a few sweet seats. | ||||||||
| - The fully exposed projector is unsightly, produces heat, and has a fan system that produces an annoying hum or buzz | ||||||||
| - The light path from the projector is easily obstructed by someone walking through the room. | ||||||||
| - It produces a dimensionally flat, matte-textured image. | ||||||||
| - Blinding beams of light which enter your peripheral view when moving. | ||||||||
| - The screen surface is easily soiled or damaged. | ||||||||
| - It doesn’t totally leverage all the optical potential that today’s HD projectors are capable of. | ||||||||
| b | ||||||||
| Despite all of the shortcomings of the system, front projection has been the favorite. But a rear projection arrangement can avoid these pitfalls. | ||||||||
| - A rear projected image is not as susceptible to be washed out by ambient light since there is no light interference in the projection light path. | ||||||||
| - The closet sized space needed behind the screen for the projector can also house the other vital A/V equipment and accomplishes the goal of total containment of sound, vibration, light and heat. Not only does it remove these malcontents from the entertainment space, it also creates an environment where the equipment can be finely temperature controlled for ultimate performance and longevity. The power cleaner, surge control, wireless controller, satellite receivers, DVR, amplifiers, receivers, and any other equipment are neatly organized on an A/V components rack. The projection room should be finished from top to bottom in ultra flat black to create the sharpest blacks and decisive contrast. | ||||||||
| - The actual space required for designing a stunning rear projection display is not as significant as once thought because with good planning and proper equipment selection, a space-efficient rear projection setup is very attainable and all of the downfalls of front projection can be avoided. | ||||||||
| - Since the image is projected from the rear, there is no obstruction of the light path and no annoyance when someone casts a large shadow on the screen. | ||||||||
| - Depending on the type of screen, some rear projection screens can easily cleaned. For example, the Blue Ocean® Rear Projection Screen is made a diffusion layer that is sandwiched between 2 panels of clear acrylic. Since the diffusion layer is internal, as opposed to surface mounted, there is no need to worry about damage as the screen can easily be cleaned or repaired. | ||||||||
| How to Choose a Screen Size: Before you get any ideas about getting a screen big enough to rival the local cinema, you need to determine what are your preferences and your limitations. | ||||||||
| How big is your room? You want to make sure that your screen fits your room and to do that, you have enough space for proper seating distances for your screen which brings us to the question of “What’s the appropriate distance for seating and viewing?” | ||||||||
| For standard HD, a safe rule of the thumb for determining your seating distance is using a 3:1 ratio (3” distance for every 1” screen height). With 1080 resolution you can get away with 2:1 but remember that even if all your hardware is 1080, not all of the actual media content watched will be native HD. When very close to the screen or if the screen is very large, this “pixilation” is evident and distracts from the optical viewing experience. (Please note the ratios above are loose guidelines and vary depending on who you ask) | ||||||||
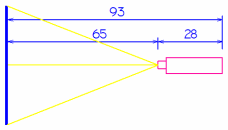
| If you plan to use rear projection, how much space can you dedicate behind the screen? How do you calculate the distance required behind the screen? Follow the 4 simple rules below and you will confidently and quickly determine your layout needs. In this example, we have used a 100” diagonal 16:9 screen (87”W x 49”H) with a Panasonic HD Projector (PT-DW7000U and optional 0.747 wide throw lens). If this is your first design, please feel free to model your screen size on this example and you can’t go wrong. | ||||||||
|
Rule #1: To calculate the space requirement behind the screen, multiply the width of your screen by the lens throw ratio: 87” x .747 Lens = 65” (Remember to use width and not the nominal screen diagonal dimension) |
||||||||
|
Rule #2: The resultant throw distance is from the back of the screen to the front of the lens, so you must add the depth dimension of the projector behind the lens. |
|
|||||||
|
The projector dimension we show here is probably the biggest on the market, so you can use this dimension safely for just about any digital projector. |
||||||||
|
Rule #3: If you need to save even more space, there are other projectors with smaller depth footprints and shorter throw lenses available -- down to 0.64. |
||||||||
|
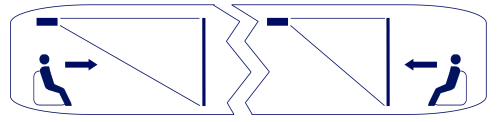
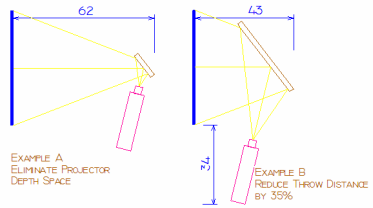
Rule #4: The A/V integrator can also install a first surface mirror mount to fold the projection path if you want to eliminate the space of the projector footprint (Ex. A), or if you need up to a 35% reduction in total throw distance (Ex. B). |
||||||||
|
|
||||||||
| Understanding Screen Gain Levels and Viewing Angles | ||||||||
|
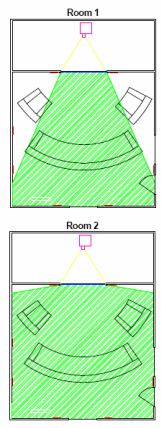
Gain – the gain of a projection screen is the amount of light visible in a given direction (e.g., on the centerline) compared to the amount of light that would be visible if a perfect diffuser were substituted for the screen. A perfectly diffusing, 100% reflecting/emitting screen would have a gain of 1.0. Such screens are coated with magnesium carbonate or titanium dioxide and are used as standards when measuring screen gain. Adjusting gain levels is a tradeoff between brightness and off-axis viewing. For instance, higher gains can be achieved with materials that reflect or emit more of the light parallel to the projection axis and less off-axis (Room 1). In other words, the light is concentrated towards the center to give it a brighter appearance but with a narrower viewing cone. However, a screen with a gain lower than 1.0 would appear not as bright but with a wider viewing cone and uniform brightness (Room 2). Many people might think that the higher gain screen might be the better choice because it is brighter, and brighter is always better on a projection screen, right? Not necessarily. The higher gain is brighter, if you are perpendicular to the center of the screen. As you walk to the side, the brightness of the screen decreases due to the narrow viewing cone (indicated in green in Room 1). This would be the preferable option if the screen is in a narrow room where viewers will not be able to be very far off-axis. Therefore, there is no reason to waste a major portion of the light from the projector by directing it at extreme horizontal angles where there are unlikely to be any viewers. On the other hand, the lower gain screen offers are very wide viewing cone (indicated in green in Room 2) and uniform brightness which is fitting for large rooms where someone might be viewing the screen from anywhere. A lower gain screen also has less chance of forming a “hot spot” since the light is being spread out.
|
 |
|||||||
5cropped.jpg) |
||||||||
| Blue Ocean® Product Glimpse | Stock Product Line | Outdoor Projection Screens | Cleaning Instructions | Showroom | Clarex BOS Information | ||||||||
| Home | About Blue Ocean | Advantages | Uses | Press | Reseller Locator | Reseller Application | Consumers | Contact Us | Reseller Login | Nippura Aquarium Page | ||||||||
|
|
||||||||
| U.S. Nippura, Inc. | 3611 Tryclan Dr. | Charlotte, NC 28217 | T: 704-561-9191 | F: 704-561-9196 | ||||||||
|
Blue Ocean® is the registered trademark of Nitto Jushi Kogyo Co., Ltd. |
U.S.
Nippura, Inc. 2006© |
|||||||